
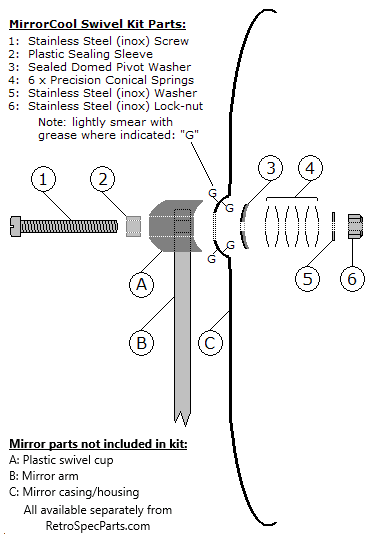
- Check that in your kit you have 11 parts, as shown in the diagram. You will also need some grease. (NB: If your mirror still has the original hard plastic surround, you will also need a flexible MirrorCool surround kit).
- Remove the mirror assembly from the door, by loosening the two small screws sufficiently to allow the arm to be moved upwards out of the mounting clamp.
- Dismantle the mirror:
- Remove the MirrorCool silicone surround trim & glass, (if your mirror still has the original hard plastic surround, refer to the instructions for the MirrorCool silicone surround kit).
- Undo the original slotted sleeve-nut at the back of the mirror with a good flat-tip screwdriver. Often this will cause the plastic half-ball to break. If so, securely hold the rectangular head of the screw while turning the slotted sleeve-nut. If the slot is damaged so that the screwdriver slips, it will need to be drilled out. This must be done carefully so that the parts to be re-used, (‘A’, ‘B’ & ‘C’ in the diagram), are not damaged. Part ‘A’ is plastic and is therefore particularly vulnerable: if it is damaged, a new replacement part is now available from our shop.
- The original screw is often seized into the mirror arm, but can sometimes be removed by holding the arm securely in a vice, and carefully tapping the remains of the screw with a suitable punch. If not, it will need to be drilled out.
- Clean parts ‘A’, ‘B’ & ‘C’ (see diagram). If you are re-using the original mirror arm, the D-shaped hole will need to be filed or drilled out so that it is circular, (5mm diameter).
- Assemble as indicated, with only a very light smear of grease, to both sides of the domed part of the mirror-head casing only, (as shown with a “G” in the diagram). The six conical springs (“4”) must be fitted in three facing pairs as shown, to give the correct tension/flexibility ratio. They must not be greased, as trapped grease could ‘hydraulic’, giving insufficient flexibility, and therefore causing accelerated wear to the moving surfaces of the mirror. Tighten sufficiently so that the mirror head is not loose enough to be moved by the wind or when driving over rough surfaces, but still allowing movement so that its position can be adjusted. Due to the precise specifications of the conical springs supplied, it should be easy to achieve this balance, as long as they have been assembled in the correct sequence.
- Fit the glass and trim, as per the instructions for the MirrorCool Mirror Surround Kit.
- Re-fit the mirror assembly to car and adjust tightness two small screws in mounting clamp.