Mirror-Head Swivel Kits for 2cv & Dyane Original Geco Mirrors
Following on from the incredible success of our MirrorCool Surround kit, which has transformed the appearance of thousands of mirrors, we then produced a solution for the next most common problem on 2CV mirrors: the failure of the internal parts which attach the mirror-head to the arm.
The Problem
Over time, moisture gets inside the back of the mirror and the mild-steel parts corrode. The corrosion then causes the metal to expand which puts pressure on the plastic half-ball that the mirror-head swivels on. As a result, either the metal parts weaken and break (and your mirror-head falls off!) or the half-ball breaks (and your mirror-head falls off!).
These mirrors were made for Citroën by Geco. Neither Citroën or Geco ever sold individual parts to repair them.
The RetroSpec / Geco Solution
A few years ago, we were able to buy the last of the stock of the individual components that were destined to be used to build these mirrors in the Geco factory, so we can now supply previously unavailable genuine Geco internal swivel parts.
The RetroSpec / MirrorCool solution
With all MirrorCool products, our main objective is to make replacement parts better and more durable than the originals. To replace the original components, we have developed our ‘MirrorCool Swivel Kit’, which consists of inox stainless steel fixings, a galvanised curved swivel plate which is rubber coated to seal against water ingress, a further plastic seal and finally a set of six precision made conical springs, which give the perfect balance in flexibility and pressure, so that the mirror-head position can be easily moved for adjustment but will remain securely in place in normal driving conditions. We are able to supply this kit for less than half the price of the 3 original Geco parts that it replaces.
Fitting instructions

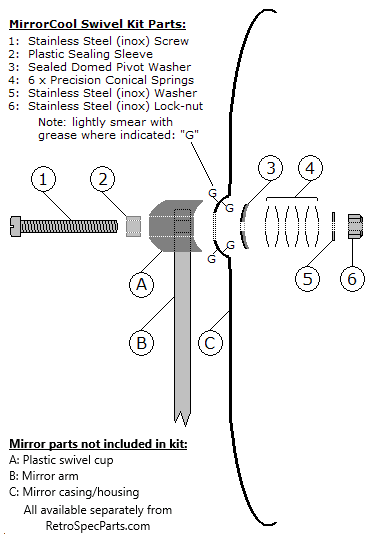
- Check that in your kit you have 11 parts, as shown in the diagram. You will also need some grease. (NB: If your mirror still has the original hard plastic surround, you will also need a flexible MirrorCool surround kit).
- Remove the mirror assembly from the door, by loosening the two small screws sufficiently to allow the arm to be moved upwards out of the mounting clamp.
- Dismantle the mirror:
- Remove the MirrorCool silicone surround trim & glass, (if your mirror still has the original hard plastic surround, refer to the instructions for the MirrorCool silicone surround kit).
- Undo the original slotted sleeve-nut at the back of the mirror with a good flat-tip screwdriver. Often this will cause the plastic half-ball to break. If so, securely hold the rectangular head of the screw while turning the slotted sleeve-nut. If the slot is damaged so that the screwdriver slips, it will need to be drilled out. This must be done carefully so that the parts to be re-used, (‘A’, ‘B’ & ‘C’ in the diagram), are not damaged. Part ‘A’ is plastic and is therefore particularly vulnerable: if it is damaged, a new replacement part is now available from our shop.
- The original screw is often seized into the mirror arm, but can sometimes be removed by holding the arm securely in a vice, and carefully tapping the remains of the screw with a suitable punch. If not, it will need to be drilled out.
- Clean parts ‘A’, ‘B’ & ‘C’ (see diagram). If you are re-using the original mirror arm, the D-shaped hole will need to be filed or drilled out so that it is circular, (5mm diameter).
- Assemble as indicated, with only a very light smear of grease, to both sides of the domed part of the mirror-head casing only, (as shown with a “G” in the diagram). The six conical springs (“4”) must be fitted in three facing pairs as shown, to give the correct tension/flexibility ratio. They must not be greased, as trapped grease could ‘hydraulic’, giving insufficient flexibility, and therefore causing accelerated wear to the moving surfaces of the mirror. Tighten sufficiently so that the mirror head is not loose enough to be moved by the wind or when driving over rough surfaces, but still allowing movement so that its position can be adjusted. Due to the precise specifications of the conical springs supplied, it should be easy to achieve this balance, as long as they have been assembled in the correct sequence.
- Fit the glass and trim, as per the instructions for the MirrorCool Mirror Surround Kit.
- Re-fit the mirror assembly to car and adjust tightness two small screws in mounting clamp.


